

How To Install Cv Axle Retaining Clip

Learn how to replace your Toyota Camry'south CV axle shaft and seal.
Amazon
Replacing Your Camry's CV Axle and Shaft Seal
This article provides detailed steps for how to remove and replace the commuter's-side CV axle and its axle shaft seal. The axle's inner or outer boots may have split, the internal bearings may be worn (making dissonance during turns), or ATF fluid may exist leaking from the axle shaft seal(south) seated in the manual differential.
This article does not address replacing the boots on a CV axle shaft. From personal experience, information technology is non worth the cost, mess, and time. New boots from your local parts supplier (if they take the boots available) unremarkably run $20. Rebuilt every bit well as new shafts with a warranty cost around $70. If re-booting is the goal, might likewise re-boot both the inner and outer boots… which at present brings the price to over $40. This translates to just a $30 toll savings to perform at least a 1.5-60 minutes effort to re-boot, combined with a big grease mess and a lot of paper towels for cleanup.
Regardless of whether the axle shaft is being replaced or non, the inner shaft (or differential) seal should exist replaced. Older, loftier-mileage cars may have seal leakage due to dry out rot, have slight damage during a shaft removal or installation chore, or take hardened with age, The cost of a new seal ordinarily runs less than $10.
The outer part of the axle shaft tin can be separated from the steering knuckle by disconnecting the lower ball joint from the lower control arm. On the Camry and some other models, it requires less fourth dimension and effort to detach the suspension strut from the steering knuckle. Although most prefer the brawl joint removal method, detaching the two bolts securing the break strut to the knuckle is easier.
The Camry inner CV beam is recessed into the differential allowing no room to position a pry bar to "pop" the beam out. However, the inner CV bearing housing has three prongs or "ears" that provide a place where a pry tool tin can push button. To gain adequate pry bar leverage against an ear to "popular" the axle shaft, position the pry bar from the top of the engine compartment.
Or run into the video below for another method to remove the inner CV axle.
Too, if you're having problems separating the outer CV axle from the steering knuckle, meet the video beneath:
Hither's a video on the rider side cv axle replacement performed on a Toyota Camry. This is a longer axle where the beam is "split" in the center by a support bearing.
Here'south a video of a beam shaft removal and seal replacement on a Toyota Highlander. The removal procedure is basically the aforementioned:
If yous want to salve your pulled axle past replacing the CV kicking, hither's a video on how to do it.
Remove the Axle Shaft
- If a high-torque bear on driver is not bachelor, the nut tension can exist relieved with a 32 mm socket fastened to a breaker bar. The axle can exist prevented from moving by leaving the front wheel resting on the ground; that is, by not jacking upwards the wheel.
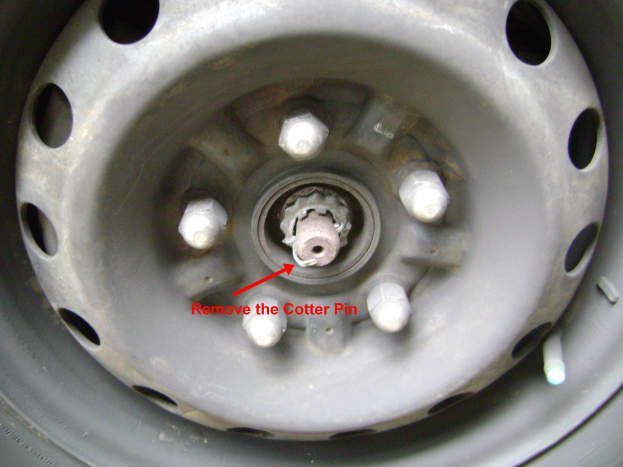
- Remove the axle shaft cotter pin with pliers.
- Remove the axle shaft nut cotter pivot alignment comprehend.
- Remove the beam shaft nut.
Bleed the Transmission Fluid
Draining the fluid earlier removing the shaft will avoid manual fluid gushing out the differential after the shaft has been pulled out.
- The bleed plug can exist removed with a Hex socket.
- Approximately 2.75 quarts of ATF should drain out. The oil can be saved and reused if the no dirt or grim drops into the drain pan.
- Screw back in the drain plug and tighten. Practice it now or you might forget.
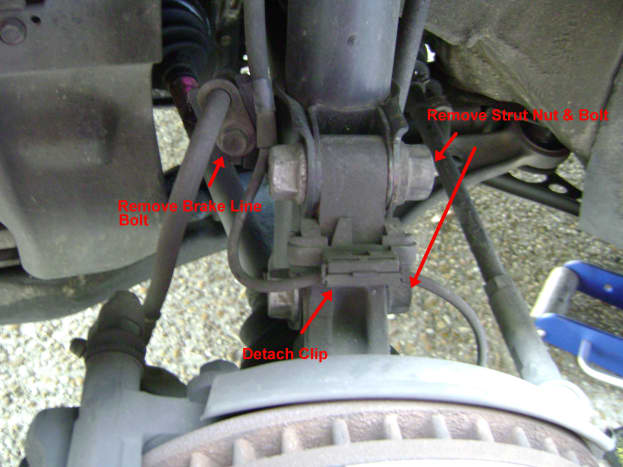
Disassemble the Strut Associates From the Steering Knuckle
- Remove the two bolts and 2 nuts that secures the strut to the steering knuckle.
- Remove the brake line bracket commodities.
- Jar the axle shaft loose from the wheel hub.
The axle shaft splines may exist stuck to the cycle hub. If a few light taps with a hammer does not push the shaft in, partially thread back on the axle shaft nut on to the beam shaft. This will allow harder hammer impacts on the shaft without dissentious the shaft threads.
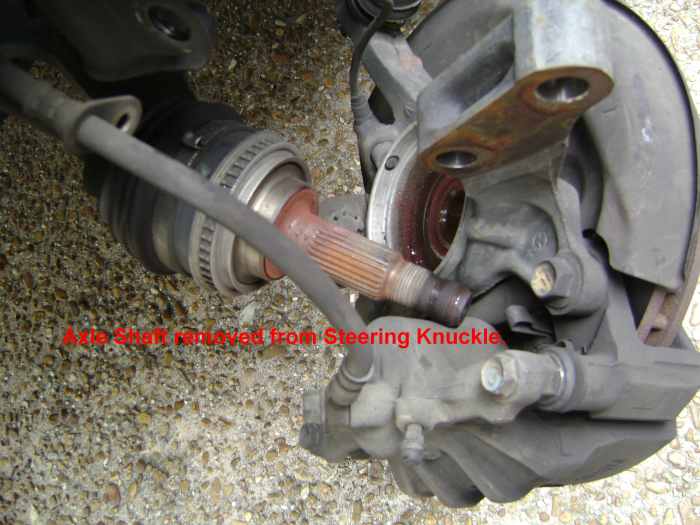
Pull the Outer Beam Shaft Away From the Steering Knuckle
- Wiggle and twist the steering knuckle free from the strut. When the two have separated, the axle shaft should have slid partially out. Pull the shaft out with your hands.
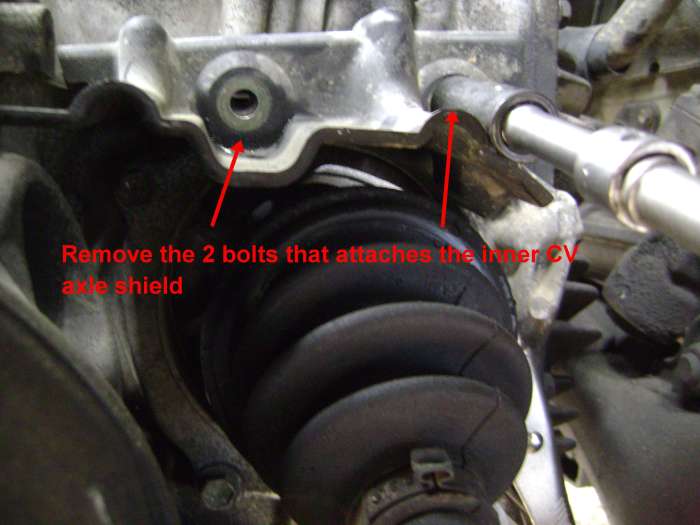
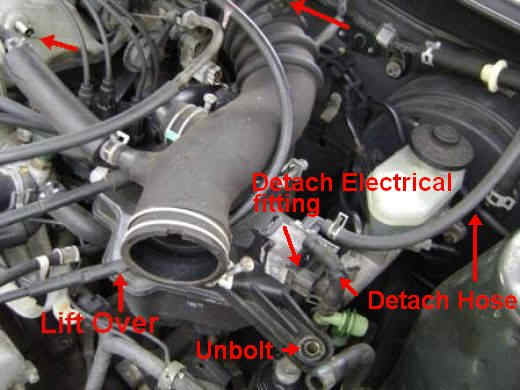
Remove the Inner CV Axle Shaft Shield and the Air Intake Hose
- Removal of this shield will allow pry bar admission to the "ears" (pry bar leverage points) of the axle's inner bearing cup.
- A clear path to the beam shaft can be fabricated past removing the air filter to throttle body intake hose. Removal of the hose should not take more than 5 minutes. *Note: Earlier putting the hose back on, clean the throttle body plate with some carburetor cleaner solvent.
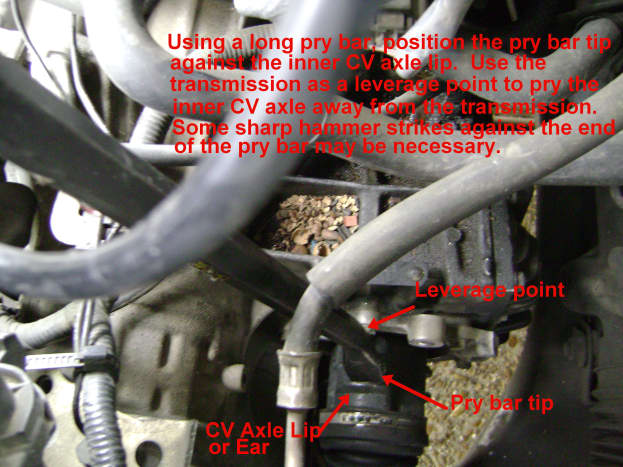
Remove the Axle Shaft From the Transmission Differential
- Rotate the axle shaft until one of the lips or ears on the CV begetting loving cup is pointing up. The manual must be in neutral to rotate the shaft. After positioning the bearing cup, place the transmission back into "park" to prevent the shaft from moving.
- From inside the engine compartment, position the tip cease of a long pry bar upward against the begetting cup ear. The pry bar leverage signal volition be the transmission housing.
- Begin applying force to the pry bar… like your trunk weight. The pulling force existence practical to the CV bearing cup must exist enough to shrink an internal snap band that prevents the shaft from pulling out and through the differential's splines. If that does not work, a few sharp hammer blows on the pry bar should provide plenty shock forcefulness to compress the ring and get the bearing cup moving. Toyota CV snap rings tend to be stronger than snap rings found in other cars (i.e., Honda, Nissan, etc.—Subaru uses compression pins to concur their inner CV axles, only that'south some other story).
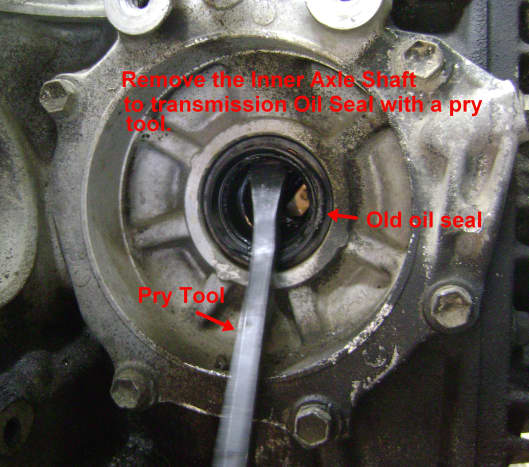
Remove the Inner CV Axle Shaft Seal
- Seal replacement is highly recommended. A lot of seal replacement jobs could take been avoided if the installer of the new axle bothered to supplant the oil seal with a new one. The part is effectually $x and just adds a few minutes to the job. Either a minor pry bar or seal removal tool will piece of work.
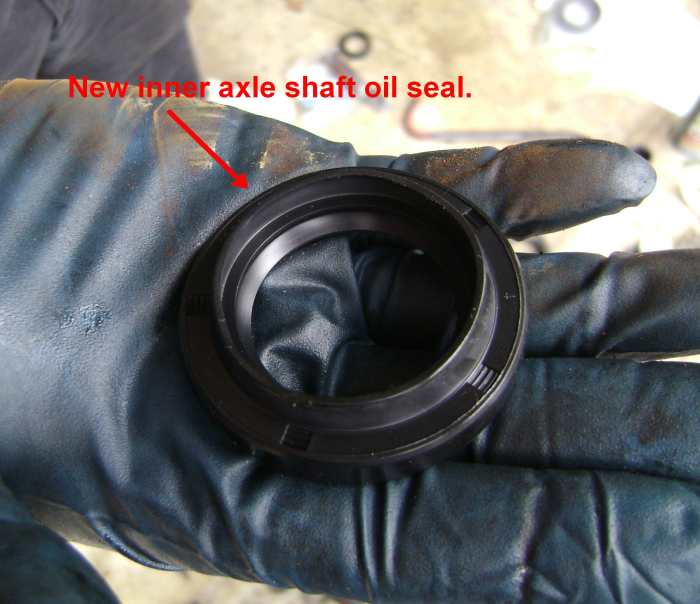
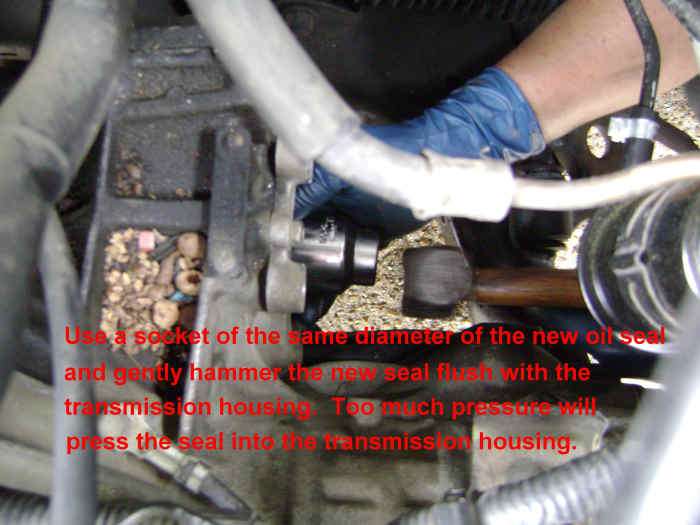
Install the New Inner CV Axle Shaft Seal
- Clean all surfaces and utilise a light glaze of grease on the manual seal seat. Position the new seal square in the seat hole. Use a big socket (effectually 34 mm) to printing the new seal in place (or use a bearing press tool similar this one). Utilise gentle taps on the socket to printing the seal and detect the progress. The seal should be flush with the transmission differential housing. Do not allow the seal to recess beyond the housing. If it does, pry it out with your fingers. To prevent damage to the new seal, practise non use any sharp tools.
Install the Axle Shaft
- Position the inner portion of the CV axle through the transmission differential axle shaft hole. Rotate the shaft until the splines from the shaft catch the splines inside the hole. The shaft should movement in approximately ½ ".
- You demand a 2d person for this adjacent step. With an extra pair of hands, marshal the axle (including the outer CV bearing cup) positioned straight towards the manual. Push button the shaft towards the manual (which should compress the inner and outer CV boots), and have your buddy strike the cease of the axle shaft gently to go the CV snap rings to compress and move through the transmission's differential spline. Ensure that the CV nut is on the shaft to forestall damage to the threads. The internal CV bearing must be seated against the CV bearing cup before hit the shaft. If not, the CV boots will be absorbing the hammer blows and the snap ring will non be compressed.
Putting It All Back Together
Reverse the above steps to get things dorsum together. A brief overview:
- Bolt on the inner CV begetting cup shield
- Reconnect the air tube / hose
- Insert the outer CV axle shaft into the steering knuckle. Rotate the shaft dorsum and forth until it aligns with the splines. Then spin on the shaft nut plenty to prevent the shaft from sliding out.
- Bolt on the pause strut to the steering knuckle along with the brake hose bracket bolt.
- Install the bike and remove your jack and jack stands.
- Torque the axle shaft nut to around 150 lbs. Applying your body weight to the billow bar should put you close to that torque.
- Fill your transmission with ATF. Double-check the fluid level after the engine is warm.
This article is accurate and truthful to the best of the author's knowledge. Content is for informational or amusement purposes only and does not substitute for personal counsel or professional advice in business, financial, legal, or technical matters.
Questions & Answers
Question: How would I pull the inner axle of my Toyota Camry?
Answer: Use a pry tool and put in between the inner bearing housing and the transmission. You can utilise hammer blows to the handle of the pry bar to jar the CV out.
Question: Can you please share your expertise on the snap ring axle retainer on the trans finish on a Toyota Camry? How does this work?
Reply: It's unremarkably referred to equally a retaining ring; not a snap ring. The band at the end of the inner CV axle joint, is compressed by applying pressure on the joint shaft when the shaft is being pushed into the transmission. The ring volition stay compressed while riding on the transmission spines until the shaft has been fully inserted and "bottomed out." The ring then expands to prevent the shaft from being pulled out unless pulled with forcefulness, which will compress the ring.
Question: What kind of oil does a 1996 Toyota Camry CV beam apply?
Reply: It doesn't use oil, it uses CV rated axle grease.
Question: What if I modify the beam seal due to a leak, and information technology nonetheless continues to leak?
Answer: Either the replacement seal was no good or installed incorrectly.
Question: How do you supervene upon the seal on the rider side of the transaxle of a 2GR-Fe (V6) 07 Camry? I noticed that a metal comprehend ring popped off and was floating effectually on the long output shaft on the passenger side before the CV axle.
Answer: Rider side CV beam removal is besides involved to explicate compared to the commuter's side. Passenger side is a split axle design. Basically, you have to remove the centre back up begetting snap band and then utilize a hammer and punch the driver the center bearing out of the bearing back up bracket.
Question: Can I utilise a CV axle of a 1995 Toyota Camry in a 1990 Toyota Celica?
Respond: Nope.
Question: Can a failing driveshaft crusade vibration while idling and tin can it cause an ABS sensor/ABS module to fail thereby?
Respond: No and no. Driveshaft problems are noticed when the car is in motion. ABS sensors are integrated into the steering knuckle and gets its readings off the ABS ring mounted on the outer CV axle. A new axle should come up with a new ABS ring.
© 2013 hardlymoving
Source: https://axleaddict.com/auto-repair/DIY-Camry-CV-Axle-Shaft-Seal-Replacement
0 Response to "How To Install Cv Axle Retaining Clip"
Post a Comment